Contents
UPDATE: Since writing this, I have presented this topic at the February 6, 2025 Eleventy Meetup. I wrote a short note that includes the video as well as a link to a PDF of the slides. Or you can also watch it directly on YouTube.
UPDATE: This post now reflects the fact that I no longer link to Amazon and their affiliate program. Instead, each book on the Books page now links to Bookshop.org. There are various additional "UPDATES" noted throughout the post.
Introduction
You can read more about the inspiration for the Books page on the page itself. The purpose of this post is to share how I built that page.
A data source
While I have been a member of the Goodreads site for a long time, my usage has been sporadic. That said, I did have periods where I noted the books I was reading. I sometimes left a review. And I added way more to my "Want to Read" list than I ever read.
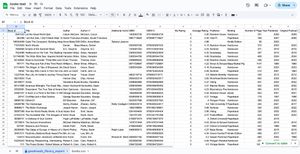
One of the blog posts that got me started on this path was this one from Chazz Basuta. That's where I got the idea to use my Goodreads data as a starting point. As Chazz points out, Goodreads stopped offering API access to one's data. But they do offer the option to export your data in a CSV format. So that's what I did. It looked something like this when imported into a Google sheet. Note that this only shows columns A through N, but the data extends out to column X.

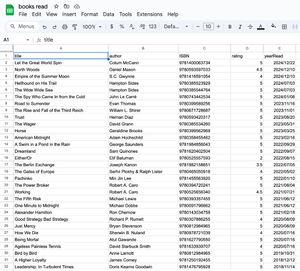
Needless to say, this needed some cleaning up. The end result looks something like this:

Many fewer columns and only the data I needed, with header row names that would lend themselves to being JSON array object properties.
The data transformation
I downloaded the data from the Google sheet in CSV format. I then went on the hunt for a CSV to JSON conversion site, of which there are many. Most of them, like most format conversion sites, are laden with ads in the hopes that their misleading language related to your conversion quest will cause you to click on an ad and generate a few cents in their direction.
To be honest, I don't recall which one I ultimately used, but it appeared to be slightly less misleading and it did the job. So, I now had a local JSON file with "most" of the data that I'd need to build the site. Or so I thought.
Of ISBNs, cover artwork, and buy links
There's a bit of a story as to how I got started with all this. And it all seemed to happen in the same week. First, I had stumbled upon Chazz's blog post. And that got me thinking that this was something quite doable. Then, on Bluesky, someone had posed a question to Melanie Richards, asking how she had built her books site. I had recalled reading Melanie's post about how she used Airtable for her source data in building her site. So I shared that response.
The third, and final leg of this stool was a chance meeting with Sean Voisen. We met in a Marin County courthouse, both serving on a jury in a criminal trial (you cannot make this shit up). Since the bookshelf idea was in my head, once I saw Sean's bookshelf on his own site, I could not help but start asking questions in the hallway during our jury duty breaks.
There's a future blog post about how I ended up on that jury.
First among my questions was where to get book cover artwork. Sean pointed me to Open Library, noting that with an ISBN number, you can easily construct a URL to access various sized book cover images. Here are the docs for that.
At this point, you might think that I'd be off to the races. Ah, but I needed those elusive ISBNs for each book. There was certainly a source, but I would need to manually look for them for each book and enter them into my JSON file. That's exactly what I did. If you search for a book title on Amazon and go to the specific product page and then do a page search for ISBN, you'll find them product details. I say them because there are 2 forms of ISBN, the 10-digit form and the 13-digit form.
Interestingly, you used to be able to construct a URL for an Amazon book listing using the 10-digit ISBN, back when Amazon's ASIN (Amazon Standard Identification Number) was the same as the ISBN. But that is no longer the case, which kinda sucks if you want to become an Amazon affiliate and automatically generate the links to the product pages that include your affiliate code. I'll come back to that later.
Anyway, I went to each of my book's Amazon pages, extracted the 13-digit ISBN, and added it to my JSON file...for each and every book. It's amazing how muscle memory can be developed after entering data for 81 books. I was never a big reader and while I'm sure I've read more than these 81, that data is lost to history.
UPDATE: As part of the update noted at the start. When I made the change to link to Bookshop.org, the ISBNs that I had manually retrieved from Amazon did not work for some of the books. At first, I thought that perhaps that Bookshop didn't have those books in its database. BUT, when I did a search, by book title, of each of the missing books, they were there. Yet they had different ISBNs than the ones I had retrieved from Amazon. So I went through the laborious process of changing the missing books' ISBNs in my JSON file to those on each product's Bookshop page.
Back to the book cover artwork. At this point, my JSON book database has the 13-digit ISBN for each book and a simple way to generate a URL for the cover artwork that could be fetched from Open Library.
Here is what a "typical" book entry in my JSON array looks like:
{
  "title": "Let the Great World Spin",
  "author": "Colum McCann",
  "ISBN": 9781400063734,
  "buyLink": "https://amzn.to/3BNdeMt",
  "rating": 5,
  "yearRead": "2024/12/22"
}
UPDATE: I'll say more about the
buyLinkproperty and the change required to link to Bookshop.org later in this post.
I'll get into the "atypical" soon enough.
There's cover artwork, but sometimes there's not
With this new found knowledge, it was now time to get the HTML page structure set up to display the contents of my JSON file, fetching artwork and showing my book ratings for each book.
Here's what my Nunjucks include file for a bkitem looks like:
UPDATE: The following has been updated to reflect the change to the Bookshop.org links, eliminating the need for the
buyLinkproperty in the JSON file (discussed later in this post).
<div class="bkitem">
	{% set bookshop_base = "https://bookshop.org/a/109591/" %}
	<a href="{{ bookshop_base}}{{ book.ISBN }}">
	{% if book.localCover %}
		<img src="/assets/img/{{ book.title | slugify }}.jpg" alt="{{ book.title | safe }}">
	{% else %}
		<img src="https://covers.openlibrary.org/b/isbn/{{ book.ISBN }}-M.jpg" alt="{{ book.title | safe }}">
	{% endif %}
	</a>
	<p class="bktitle"><a href="{{ bookshop_base}}{{ book.ISBN }}">{{ book.title | safe }}</a></p>
	<p class="bkauthor">by {{ book.author }}</p>
	{% if book.rating != "" %}<p class="bkrating">{{ book.rating | bookRating }}</p>{% endif %}
</div>
While it's pretty straightforward, you might be wondering WTF is that book.localCover property? As it turns out, Open Library does not have cover artwork for every book on earth. I wound up getting a simple image with the text no image available for a bunch of my books. It made the whole list look like crap and I was not going to let this slide.
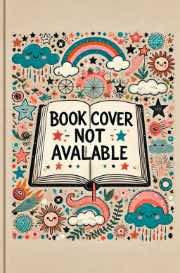
I iterated my way to the ultimate solution after a few failed attempts. The first iteration was a bit of a sideshow. I fell into the rabbit hole of AI image generation. I thought I'd try to be cute. So I asked one of the AI image generation sites to generate an image that indicated that no book cover was available. It looked like this:

While it is kinda cute, showing interior pages where you can't see the book cover, too much of this in my list of real book covers made it look quite childish. And I'm a grown-ass adult. This would not stand. Fortunately, I only spent an hour or so on this attempt.
My second idea, which hit me the next morning, was a boatload simpler. Simply use some CSS to generate a stylized box with the text "no image available". I liked this idea a lot better. But it suffered from the same issue as the AI generated image. It was too prevalent on the page.
What I wanted was genuine book cover art for each and every book. That was not too much to ask.
By this time I was used to doing a lot of things manually for every book. So, how hard would it be to download the images, one at a time, from the Amazon product page. It turned out that this was very straightforward and sizing the image properly was quick and efficient using my favorite image editor, Pixelmator Pro.
So, now you have the answer to the question that opened this section. If the localCover property is set to true, the downloaded image is used. If not, the Open Library image is fetched at build time.
UPDATE: One of the other "side effects" of updating the ISBNs to match what was on each Bookshop page, some of those ISBNs no longer matched with cover images on Open Library. So I had to download images for those books. As a result, I have a lot more
localCoverimages.
I have one final note on those Open Library images. They are remote images that are quite static in themselves. So I really don't want to be fetching them on every build. One nice thing about using the Eleventy Transform feature of the Eleventy image plugin is that you can specify a cache directory and duration for the caching of those remote images, as seen in the docs. I think that's a nice build performance feature. And now that this site lives on Cloudflare Pages, and CF Pages is supporting the .cache folder for Eleventy, I'm all set...not just in local build performance, but in the production environment too.
The buyLink property
Since I joined the Amazon affilliate program, in order to have a link to the book's product page, I needed to generate and manually enter the Amazon product page URL for each book. This was a bit more tedious than the ISBNs, but I got through it. So that's the buyLink property.
UPDATE: As noted at the start, I no longer link to Amazon. Instead, I link to Bookshop.org. And since the affiliate link to a book on Bookshop.org can be easily constructed, given an affiliate ID and an ISBN, I no longer need a dedicated
buyLinkproperty in my JSON file. Now, a "typical" book entry looks like this:
{
  "title": "Let the Great World Spin",
  "author": "Colum McCann",
  "ISBN": 9781400063734,
  "rating": 5,
  "yearRead": "2024/12/22",
  "localCover": true
}
The rating property
I generate a simple 1 to 5 star rating for each book. There are full stars (★) and then there is the ½ character. This is done using a filter on the rating property. Here is what the filter looks like. There's probably a more efficient way to do this, but this is what I came up with.
// generate the displayed book rating with stars and '1/2' characters
export const bookRating = (rating) => {
  const fullStar = "★";
  const halfStar = "½";
  let stars = "";
  // if the rating is blank, its a "currently" reading book
  if (rating === "") {
    return stars;
  }
  for (let i = 1; i <= 5; i++) {
    if (rating - i >= 0) {
      stars += fullStar;
    } else if (rating - i === -0.5) {
      stars += halfStar;
    }
  }
  return stars;
};
Why would there ever be a noStar rating. Note that in the HTML structure above, I test to see if the rating value is blank. This is a special case to deal with the book that I am currently reading and have not yet rated. That's its only purpose. Edge cases...I tell ya.
Sorting books by the year that I read them
The data in Goodreads has a full date for the books I've read. It represents the date that I marked it read in Goodreads. The dates in my JSON file look like this: 2024/12/22. I wanted to sort them by descending year.
But I had a little bit of a problem. As I perused the physical bookshelves in my office there were a sufficiently large number of books that I had read (shelved among a bunch of other books that still remain unread), but I had no memory of what year that I had read them and I had never entered them into Goodreads.
So, in addition to wanting to sort and have dividers for each year on the page, I decided to have an undated section at the end.
Side note: Interestingly, some of Melanie Richards' books have a DNF indicator for books that she did not finish. A cool idea in itself.
To start the page, I needed a way to designate the book that I am currently reading. To do that, I simply set the yearRead property to currently. Simple enough. Did someone say edge cases?
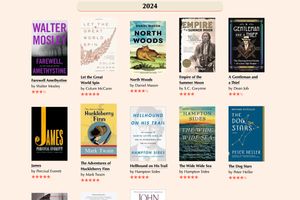
Below is the Nunjucks template for the books page (absent the front matter and other full page layout stuff). It creates a divider for each year and also creates links to each year at the top of the page (inspired by Cory Dransfeldt's bookshelf).
Note that I created a handful of supporting javascript data files to help with the date formatting and sorting. If you want to dive into those, there on the GitHub repo in this file. One example is the books.years array that is used to generate the links at the top of the page. It generates array items like y2024 which can be used as an anchor link later in the page (yet the y is removed for use in the link text; since we can't have ID's that start with numbers, I needed that 'y'...see the <h2> inside of the loop).
<div class="bookyears">
	{% for year in books.years %}
		<a href="#{{ year.year }}">{{ year.year | replace("y", "") }}</a>{% if  not loop.last %} / {% endif %}
	{% endfor %}
</div>

	<h2 class="bookyear">Currently Reading</h2>
	{% set book = books.currentBook[0] %}
		<div class="bklist">
			{% include "bookitem.njk" %}
		</div>

	{% set previous_year = "" %}
	{%- for book in books.datedBooks %}
		{# extract the year from the yearRead property that is formatted as yyyy/mm/dd #}
		{%- set current_year = book.yearRead | truncate(4, true, '') -%}
		{%- if current_year != previous_year %}
			{# if we're changing years and it's not the first year,
				close the 'bklist' div on the prior year, set the heading id
				to the new year, update the previous_year, and open a new bklist div #}
			{% if not loop.first %}</div>{% endif %}
			<h2 id="y{{ current_year }}" class="bookyear">{{ current_year }}</h2>
			{% set previous_year = current_year %}
			<div class="bklist">
		{%- endif %}
		{% include "bookitem.njk" %}
		{# close the 'bklist' div on the last book in the list #}
		{% if loop.last %}</div>{% endif %}
	{%- endfor %}
</section>

<h2 id="undated" class="bookyear">Undated: don't know when I read these</h2>
<div class="bklist">
	{%- for book in books.undatedBooks %}
		{% include "bookitem.njk" %}
	{%- endfor %}
</div>
This technique of separating entries by year is similar to what I did to delineate entries by year on the 11ty Bundle Firehose page.
Conclusion
That's pretty much it. It wasn't terribly difficult and I enjoyed the journey. And now it's pretty easy for me to add one book at a time to the books.json file.
What I also find interesting is that as I was writing this up yesterday and today, I managed to learn some things and make some changes to how it actually works. It's funny that when you go to describe something you've built, you sometimes realize that it could be even better, or that you had not considered something along the way. The best example of this is realizing that I could cache the Open Library images using the Eleventy transform feature.
Finally, the best part of this is that I'm a bit more motivated to read. I've started a morning habit where I have my morning coffee while reading 25 pages of whatever book that I'm currently reading. I do not sit down in my office until those 25 pages are in the bag. It's a nice way to start the day and a great way to build some consistency.
"UPDATE:" The change from Amazon to Bookshop.org, while a first time pain, will make entering info for new books simpler. I will no longer have to go to Amazon to get an affiliate link as it can be easily constructed using the ISBN. As for cover images, I will occasionally have to download cover images. But I've got a pretty easy manual process for that.
"UPDATE" In anticipation of presenting this topic at the Eleventy Meetup, I am adding several samples of other book pages built with 11ty (alpha by first name).
- Chazz Basuta's books and how he built it
- Cory Dransfeldt's books and how he built it
- Dan Jewett's books
- Melanie Richards's books and how she built it
- Sean Voisen's books
Previous post: I'm really not enjoying these afib episodes
Next post (in time): Number 24, a powerful WW II movie
